How to Use a Hydrometer in Home Brewing
A hydrometer is an indispensable tool for you as a home brewer dedicated to perfecting your craft. This straightforward yet powerful instrument measures the specific gravity of liquids, offering you crucial insights into both fermentation progress and sugar content. It can significantly aid in the process of brewing beer, cider, and wine by providing critical data for your brewing recipe.
In this guide, you’ll discover what a hydrometer measures, its importance in the brewing process, and how to select the right one that suits your needs. We ll also provide you with step-by-step instructions on using a hydrometer effectively, alongside common pitfalls to steer clear of. From understanding the basics of hydrometer use to the specifics of wort measurement and temperature correction, this guide has you covered.
Whether you’re just starting out or have been brewing for years, mastering the use of a hydrometer, including understanding hydrometer calibration and stability, can significantly enhance your brewing experience.
Contents
- Key Takeaways:
- What is a Hydrometer?
- Why is a Hydrometer Important in Home Brewing?
- Understanding Hydrometer Readings
- How to Choose the Right Hydrometer for Home Brewing?
- What Are the Different Types of Hydrometers?
- What Are the Features to Look for in a Hydrometer?
- How to Use a Hydrometer in Home Brewing?
- Interpreting the Hydrometer Reading
- Common Hydrometer Mistakes in Home Brewing
- Frequently Asked Questions
- What is a hydrometer and why is it important in home brewing?
- How do I use a hydrometer in home brewing?
- What is the correct temperature to take a hydrometer reading at?
- How can I ensure accurate readings with my hydrometer?
- Can I use a hydrometer to determine the alcohol content of my beer?
- Are there any other uses for a hydrometer in home brewing?
Key Takeaways:
- A hydrometer is a valuable tool in home brewing as it helps measure the specific gravity of the wort or beer, indicating the progress of fermentation. It can also assist in determining the correct ABV calculation for your final product.
- It is important to sanitize the hydrometer and take a proper sample to get an accurate reading. Interpreting the hydrometer reading can help determine the ideal specific gravity for different stages of brewing, such as the original gravity (OG) and final gravity (FG).
- Factors such as temperature and air bubbles can affect the hydrometer reading, so it is important to take precautions and avoid common mistakes when using a hydrometer in home brewing. Proper temperature correction and the use of a sample tube can help achieve more accurate readings.
What is a Hydrometer?
Get ready to elevate your brewing game with this essential tool! A hydrometer is a critical tool in your brewing journey, allowing you to measure the specific gravity of liquids, particularly wort the cornerstone of beer, cider, and wine production. This aspect is crucial for density measurement and tracking fermentation progress.
This clever device operates on the principle of buoyancy, which is the ability of an object to float in a liquid, offering readings that reveal the density of your liquid in comparison to that of water. By mastering the hydrometer’s readings, you can effectively monitor fermentation progress and determine both the original gravity (OG) and final gravity (FG), crucial metrics for calculating the alcohol content (ABV) of your finished brew.
You ll find an array of variations available, such as the refractometer, which performs a similar function but caters to distinct applications in the brewing process. Understanding refractometer readings can improve your brewing techniques and overall success.
What Does a Hydrometer Measure?
A hydrometer is your trusty tool for measuring the specific gravity of liquids, which plays a vital role in the brewing process, particularly in determining the alcohol content of beer, cider, and wine.
By taking readings from the wort before and after fermentation, you can nail down both the original and final gravity. Original gravity tells you the density of the unfermented wort, which is packed with sugars that will eventually transform into alcohol and carbon dioxide during fermentation. This initial measurement is crucial as it lays the groundwork for calculating the potential alcohol content.
The final gravity reveals the density after fermentation, indicating just how much sugar has been gobbled up by the yeast. Grasping the difference between these two readings is essential. Not only does it quantify alcohol production, but it also offers valuable insights into fermentation progress and the overall balance of flavors in your finished beverage.
Paying attention to specific gravity points can aid in fine-tuning your brewing process.
Why is a Hydrometer Important in Home Brewing?
A hydrometer is an essential tool in your home brewing journey, enabling you to measure and comprehend the fermentation process a key element in crafting high-quality beer, cider, and wine.
By precisely gauging the specific gravity of the wort at various stages of fermentation, you can determine both the original gravity (OG) and final gravity (FG). This allows you to calculate the alcohol by volume (ABV) of your finished masterpiece. Accurate hydrometer testing at each stage will provide reliable data for ABV calculation.
A dependable hydrometer confirms that fermentation is unfolding as planned, enabling you to make necessary adjustments in yeast pitching and fermentation temperature. These adjustments are crucial for achieving the flavor profiles and alcohol content you desire. Using the right hydrometer guidelines can help you troubleshoot issues effectively.
How Does a Hydrometer Help in the Brewing Process?
A hydrometer is a critical tool in your brewing arsenal, enabling you to take precise readings at various stages of the process. This allows you to monitor fermentation progress and assess the alcohol content of your brew with confidence.
Proper hydrometer use ensures accurate brewing measurements and consistent results. This vital instrument not only reveals the specific gravity of the wort but also provides critical insights into the health of your fermentation.
By regularly checking these readings, you can make necessary temperature adjustments to optimize yeast activity or identify the perfect moment to pitch your yeast. Monitoring the liquid level in your sample tube can also affect the accuracy of your readings.
Hydrometer measurements offer invaluable data for gauging the efficiency of sugar conversion, ultimately influencing your final alcohol content. As you deepen your understanding of these dynamics, you can refine your fermentation strategies, guaranteeing you a flavorful brew while dodging common pitfalls!
Understanding Hydrometer Readings
To gain insights from your hydrometer, familiarize yourself with terms like specific gravity, which measures the density of your liquid compared to water. Understanding these readings is essential for successful brewing.
How to Choose the Right Hydrometer for Home Brewing?
Selecting the right hydrometer for your home brewing endeavors is crucial for achieving precise readings that can greatly influence the quality of your beer, cider, or wine. Considering the specific needs for hydrometer adjustments and calibrations can ensure better accuracy.
When choosing a hydrometer, take into account factors like:
- Specific gravity range
- Calibration
- Type different hydrometers are tailored for various applications throughout the brewing process.
Some hydrometers boast versatility, able to accommodate a range of liquids, while others are meticulously designed for specific measurements, such as low or high alcohol content. Utilizing a hydrometer calculator can help in making these choices.
By understanding your brewing requirements and familiarizing yourself with the types of hydrometers available, you ll be well-equipped to make an informed decision that elevates your brewing experience. Ensuring hydrometer stability during measurements is key to achieving accurate results.
What Are the Different Types of Hydrometers?
As a home brewer, you have a variety of hydrometers designed for different measurement tasks. Whether it s the standard hydrometer, a refractometer, or specialized versions for brewing beer and wine, understanding these tools can significantly elevate your brewing experience.
Take the standard hydrometer, for example. It’s your go-to tool for measuring the specific gravity of liquids. This helps you estimate alcohol content and track fermentation progress. It operates on the principle of buoyancy and provides clear, reliable readings. However, it does have its limitations, especially when dealing with particularly viscous samples. Having a hydrometer guide can offer additional insights into its proper use.
Now, let s talk about the refractometer. This handy device measures the refractive index of liquids and is essential for quickly assessing sugar content during both pre- and post-fermentation stages. However, remember that when measuring after fermentation, sugar levels can be a bit deceptive due to the influence of alcohol. Knowing how these readings differ can elevate your brewing game!
Each type of hydrometer has its unique advantages and constraints. It s important to consider these factors when selecting the right tool for your hydrometer testing needs. Whether you focus on brewing beer or making wine, choosing the right tool can make a significant difference.
What Are the Features to Look for in a Hydrometer?
When choosing a hydrometer, consider several key features to guarantee accurate and reliable measurements during your brewing process.
First and foremost, accuracy is critical; even slight deviations can lead to inconsistent results. Calibration is equally important. Opt for a hydrometer that can be adjusted based on the specific gravity of your liquids to ensure trustworthy readings over time. Regular calibration checks can help maintain the hydrometer’s accuracy.
Stability is another vital aspect, especially during fermentation or with temperature fluctuations. It plays a pivotal role in maintaining precision. The hydrometer’s range should match your brewing methods, whether you measure wort, must, or other liquids. Ensuring that your hydrometer remains stable during readings can prevent errors in your brewing batch.
By thoughtfully considering these factors, you can significantly enhance your brewing experience, leading to more successful batches and improved flavors in your creations.
How to Use a Hydrometer in Home Brewing?
Using a hydrometer in home brewing is a meticulous process involving several essential steps vital for obtaining accurate readings that track fermentation progress and help you achieve your desired alcohol content.
It all begins with proper sanitation, which is crucial to prevent contamination. Once you establish that, you ll need to extract a sample of wort or beer for testing. Using the correct hydrometer method ensures your samples provide accurate data for brewing.
Carefully place the hydrometer into the sample to take a reading; this will reveal crucial information about the specific gravity and sugar content of the liquid. Understanding these readings lets you make informed decisions that guide your fermentation and enhance your alcohol production. Properly handling hydrometer drops can also prevent damage and ensure accurate readings.
Step 1: Sanitize the Hydrometer
To effectively use a hydrometer, your first step is to sanitize it thoroughly. This avoids contamination that could compromise the quality of your beer, cider, or wine.
Without proper sanitation, even the tiniest trace of bacteria or wild yeast can derail your brewing process, resulting in off-flavors and spoilage. Using a reliable sanitizing solution like Star San or a simple bleach-water mixture ensures that every surface and tool, including your hydrometer and measuring vessels, remains free from unwanted microbes. Proper sanitation is critical for successful brewing.
Allow your equipment to soak for at least 10 to 15 minutes to significantly enhance the sanitization process. Once soaked, rinse everything with boiled or distilled water to minimize the risk of reintroducing any contaminants.
Properly sanitized equipment is crucial for maintaining the specific gravity and ensuring accurate brewing measurements during the brewing process.
Follow these sanitation methods to create a clean environment that fosters the best flavors in your crafted beverages, whether you are brewing beer, cider, or wine.
Step 2: Take a Sample of the Wort or Beer
Accurate wort measurement is a foundational step in the brewing process.
Once you ve sanitized the hydrometer, the next step is to take a sample of the wort or beer. This is crucial for obtaining accurate hydrometer readings. It allows you to determine the specific gravity and ensures that your brewing batch reaches the desired flavor profile and alcohol content.
When gathering a wort sample, use a clean, sanitized container. Fill it with the right volume typically around 200-300 milliliters to ensure precise measurement. Pour gently to minimize the introduction of air bubbles, as these can distort your readings and lead to inconsistent results.
Monitoring the wort density is essential for precise density measurement. By adhering to these techniques, you can confidently monitor your fermentation progress and make informed adjustments throughout the brewing cycle.
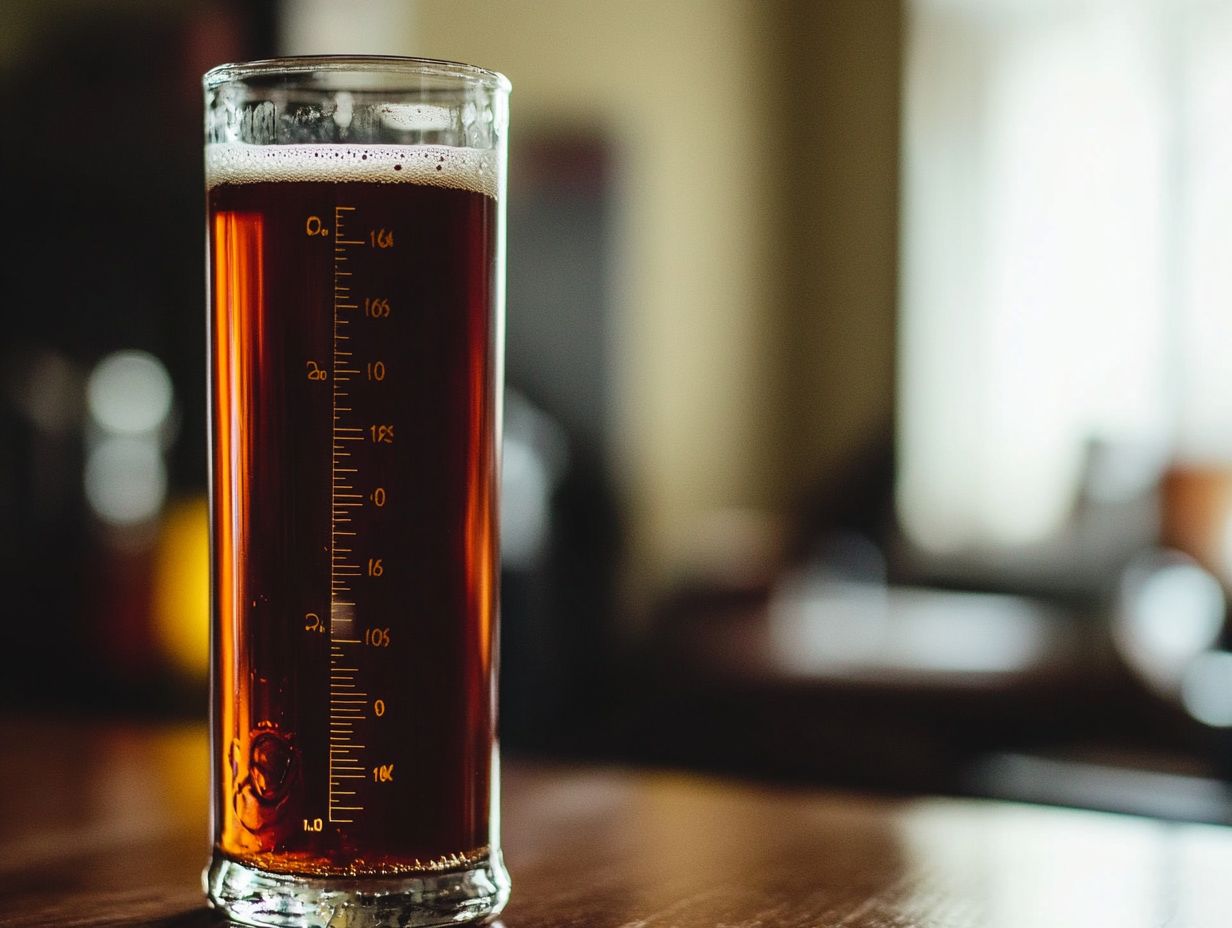
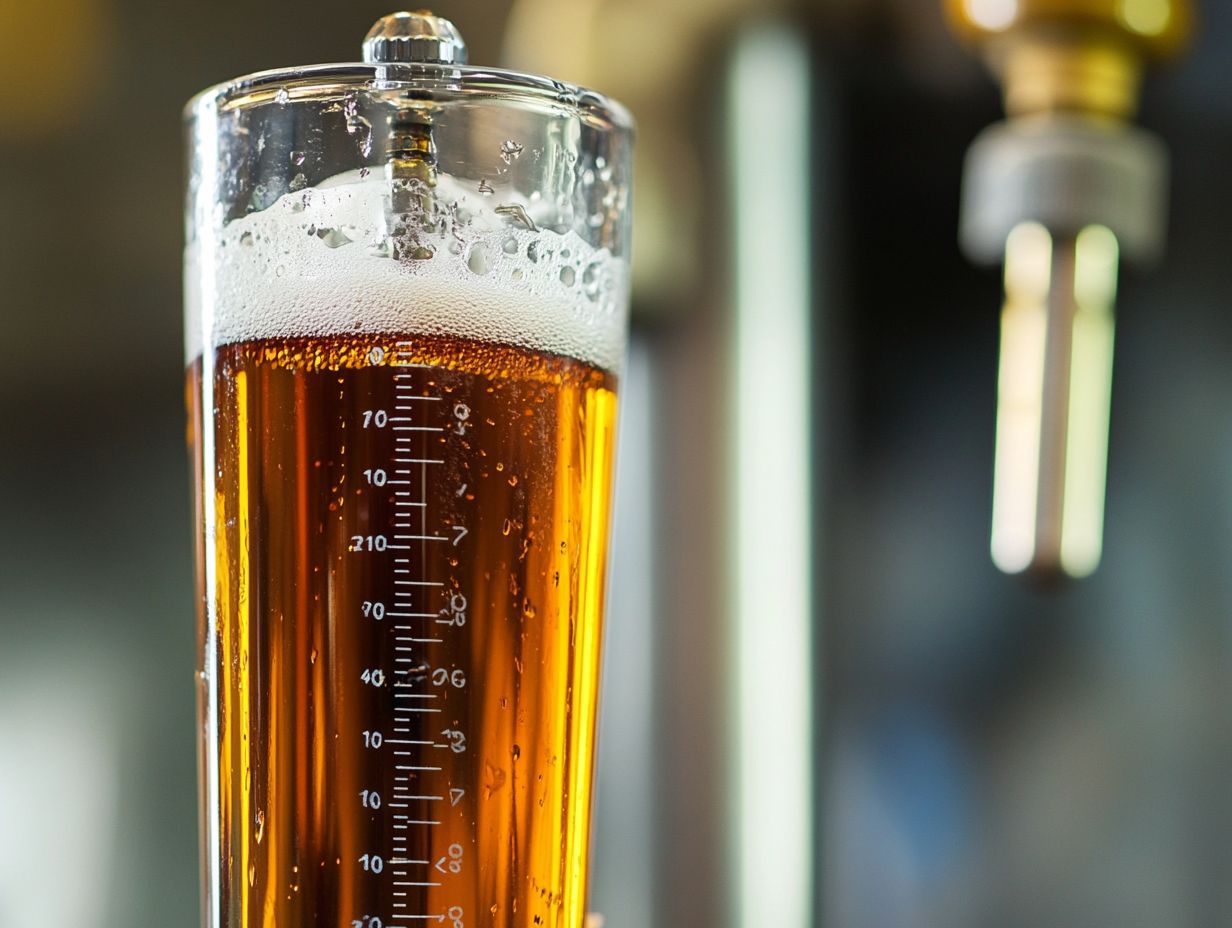
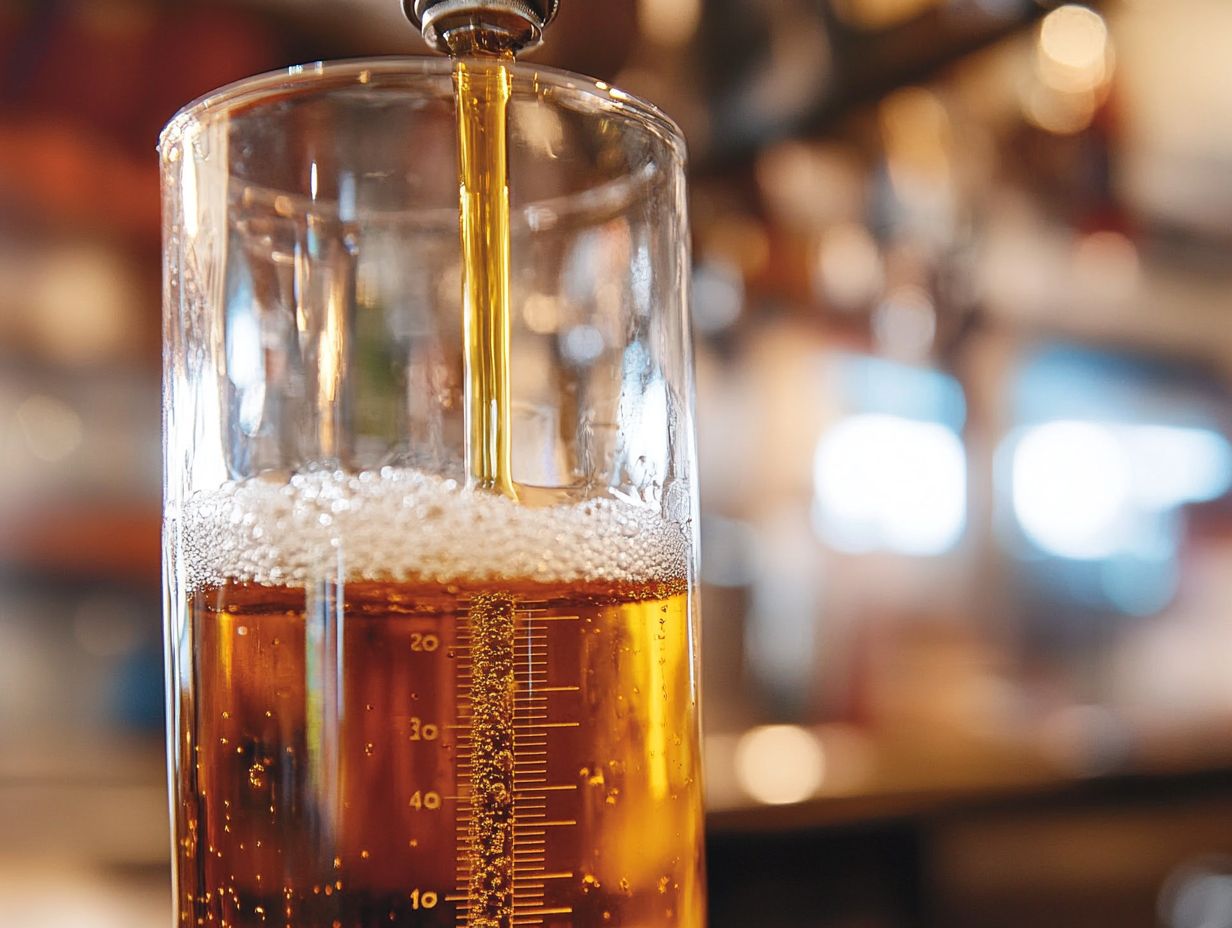
Step 3: Place the Hydrometer in the Sample
Once you have your sample ready, gently place the hydrometer into the liquid, allowing it to float freely for accurate readings. This is essential for obtaining reliable data, as the accuracy of your hydrometer testing hinges on its proper positioning.
Ensure that the liquid level is deep enough for the hydrometer to be fully submerged without contacting the sides of the sample tube. If the hydrometer touches the walls, it can lead to misleading readings, distorting your understanding of the sample’s specific gravity. Strive for a straight vertical alignment to ensure that the meniscus the curve created by the liquid s surface aligns perfectly with the calibrated scale of the hydrometer.
This meticulous setup will enable you to take precise measurements, offering clearer insight into the liquid s density and other valuable properties. Always consider temperature correction for accurate readings.
Step 4: Take the Reading
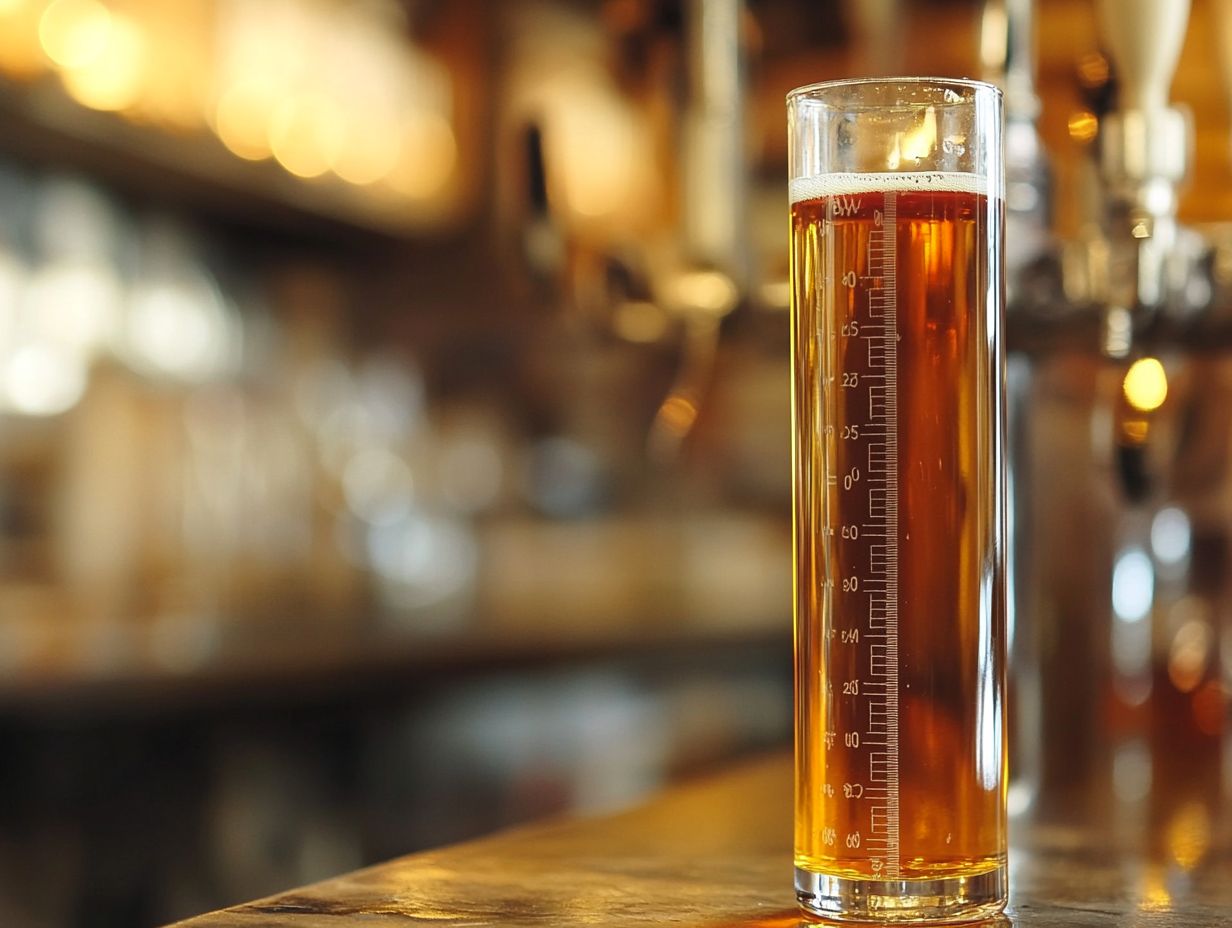
Taking the hydrometer reading requires you to observe the liquid level at the meniscus. This reveals the specific gravity of your sample and provides valuable insights into the fermentation process and potential alcohol content.
Accurate readings are essential, as they help you determine how much sugar has been transformed into alcohol during fermentation. Typically, a decrease in specific gravity over time indicates that the yeast is diligently working on the sugars present in the wort.
By regularly monitoring these readings, you can gauge when fermentation is approaching its conclusion. This allows you to take timely actions such as bottling or adjusting ingredients. The final specific gravity is instrumental in calculating the overall alcohol by volume (ABV), giving you a clearer understanding of your brew s strength and character.
By grasping these nuances, you enable yourself to produce consistent, high-quality beverages!
Interpreting the Hydrometer Reading
Using a hydrometer calculator can help in interpreting the results effectively.
Interpreting the hydrometer reading is an essential skill in the brewing process. It offers you valuable insights into the specific gravity of your wort or beer and the stage of fermentation.
By grasping these readings, you can evaluate the progress of fermentation, fine-tune your brewing recipes, and determine the final alcohol content of your beverages accurately.
Each reading obtained from the hydrometer serves as a crucial indicator. It guides you on whether adjustments need to be made in your beer-making process or if fermentation has reached its completion.
What is the Ideal Specific Gravity for Different Stages of Brewing?
Understanding specific gravity points throughout the brewing process is vital.
The ideal specific gravity shifts throughout the process, providing you with crucial benchmarks to monitor fermentation and ensure your alcohol production is a success.
In the initial phase, take a reading of the wort. This specific gravity acts as a vital indicator of your potential alcohol content, known as the original gravity. Typically, this initial measurement will range between 1.040 and 1.060, depending on your chosen recipe.
As fermentation progresses, the yeast consumes the sugars, and you ll notice the specific gravity dropping. This reflects the transformation of those sugars into alcohol and carbon dioxide. Don’t forget to take post-fermentation readings before bottling, ideally around 1.010 to 1.015. This is referred to as the final gravity.
These final gravity figures reveal the alcohol content and indicate that fermentation has finished. This signals that your brew is primed for the next steps in the process.
Common Hydrometer Mistakes in Home Brewing
Using a hydrometer in home brewing might appear simple at first glance. However, there are several common pitfalls that can lead to inaccurate readings and compromise the quality of your beer, cider, or wine.
Understanding these common mistakes is key to brewing great beer. Proper hydrometer calibration and following detailed hydrometer instructions can greatly improve your accuracy.
Among the most frequent errors you might encounter are improper temperature correction, neglecting to clean or calibrate the hydrometer, and misreading the meniscus (the curved surface of the liquid in the hydrometer). Each of these miscalculations can skew the true specific gravity, ultimately affecting fermentation progress and alcohol content.
What Are the Factors that Can Affect the Hydrometer Reading?
Several factors can significantly impact the accuracy of your hydrometer reading, including temperature variations, the density of the wort, and the nuances of alcohol distortion.
Additionally, hydrometer stability and ensuring proper hydrometer buoyancy are critical.
When you use a hydrometer to measure the specific gravity of a liquid, keep in mind that fluctuations in temperature can lead to skewed results. Hydrometers are calibrated to operate within a specific temperature range, making this crucial.
The density of the wort, influenced by the ingredients you choose and the fermentation process, plays a vital role as well. A denser liquid will yield different readings than a lighter one, and accurate gravity reading depends on maintaining these ideal conditions.
Alcohol distortion is pivotal. As the alcohol content increases during fermentation, it alters the liquid’s density, potentially misrepresenting the true state of fermentation. Understanding and accounting for these variables is essential for ensuring reliable hydrometer accuracy.
For more precise measurements, a refractometer reading can be used in conjunction with hydrometer results.
Ultimately, this knowledge will impact your fermentation outcomes and the overall quality of your final product. For those new to the process, consulting a hydrometer guide or using hydrometer flasks can further ensure accuracy.
Frequently Asked Questions
For those new to home brewing, consulting resources like Northern Brewer or the wisdom of Julia Child on precise measurements can be invaluable.
What is a hydrometer and why is it important in home brewing?
A hydrometer is a tool used to measure the heaviness of a liquid compared to water. This measurement is crucial in home brewing because it helps track fermentation progress and determine the alcohol content of your beer.
Accurate density measurement is essential for the success of your brewing process.
How do I use a hydrometer in home brewing?
To use a hydrometer, start by taking a sample of your beer and pouring it into a hydrometer jar. Gently lower the hydrometer into the jar, ensuring it floats freely.
Take a reading at eye level and record the specific gravity measurement. Following the correct hydrometer method guarantees accurate results.
What is the correct temperature to take a hydrometer reading at?
For the best results, stick to a temperature of 60 F (15.5 C) when taking a hydrometer reading. This is the standard temperature for most readings, allowing for accurate measurements.
Make sure to adjust for temperature correction if readings are taken outside this range.
How can I ensure accurate readings with my hydrometer?
Always calibrate your hydrometer before each use to ensure your brewing success. This can be done by checking the specific gravity reading in distilled water, which should be 1.000 at 60 F (15.5 C).
Proper hydrometer adjustments are vital for precision.
Can I use a hydrometer to determine the alcohol content of my beer?
Yes! A hydrometer can help determine the alcohol content of your beer by taking two readings: one before fermentation and one after.
The difference between the two readings will give you the alcohol by volume (ABV) of your beer. This process is crucial for accurate ABV calculation.
Are there any other uses for a hydrometer in home brewing?
A hydrometer can also be useful for checking if your beer has finished fermenting and troubleshooting any issues during the fermentation process, such as stuck fermentation or contamination.
For instance, a refractometer can provide a secondary check to confirm your findings.
Try using your hydrometer today and take your brewing to the next level!